반응형
본 포스팅은 인프런의 캡틴판교님의 Vue.js 중급 강의를 기반으로 만들어졌습니다.
개요
회사에서 뷰를 사용하기 시작하여 뷰 강의를 듣기 시작하였고 인프런 캡틴판교님의 강의가 유명하다고 들어 초급, 중급 강의를 듣게 되었다.
그중에 중급 강의에서는 vue로 todo list를 만들게 되는데 강의를 보고 만들었고 그것을 기반으로 다시 프로젝트를 생성하며 정리한 내용을 올리려고 한다.
vue 프로젝트 생성
1. node.js 설치, vue 설치
https://nodejs.org/ko/download/
다운로드 | Node.js
Node.js® is a JavaScript runtime built on Chrome's V8 JavaScript engine.
nodejs.org
vue 프로젝트를 생성하려면 node.js가 필요하기 때문에 node.js를 먼저 다운로드한다.
- node 설치 후
npm install vue
2. 프로젝트 생성
vue create {프로젝트 명}
프로젝트 생성 시 질문 사항
? Please pick a preset: (Use arrow keys)
  => default(Babel, eslint) 선택 시 바로 설치 진행
  => Manually select features 선택 시 아래 질문 사항 진행

? Check the features needed for your project:
  => Babel, Router

? Use history mode for router? (Requires ~ in production) (Y/n)
  => Y

? Where do you prefer placing config for ~
  => In package.json

? Save this as a preset for future project?  (Y/n)
  => n
개발 소스
- 파일 구성
- index.html
<!DOCTYPE html>
<html lang="">
  <head>
    <meta charset="utf-8">
    <meta http-equiv="X-UA-Compatible" content="IE=edge">
    <meta name="viewport" content="width=device-width,initial-scale=1.0">
    <link rel="icon" href="<%= BASE_URL %>favicon.ico">
    <title><%= htmlWebpackPlugin.options.title %></title>
    <link rel="stylesheet" href="https://pro.fontawesome.com/releases/v5.10.0/css/all.css" integrity="sha384-AYmEC3Yw5cVb3ZcuHtOA93w35dYTsvhLPVnYs9eStHfGJvOvKxVfELGroGkvsg+p" crossorigin="anonymous"/>
    <link rel="stylesheet" type="text/css" href="//fonts.googleapis.com/css?family=Ubuntu" />
  </head>
  <body>
    <noscript>
      <strong>We're sorry but <%= htmlWebpackPlugin.options.title %> doesn't work properly without JavaScript enabled. Please enable it to continue.</strong>
    </noscript>
    <div id="app"></div>
    <!-- built files will be auto injected -->
  </body>
</html>
- App.vue
<template>
  <div id="app">
    <TodoHeader></TodoHeader>
    <TodoInput @addTodoItem="addTodoItem"></TodoInput>
    <TodoList @completeTodo="completeTodo"  @removeTodo="removeTodo" :todos=todos></TodoList>
    <TodoFooter @clearTodoAll="clearTodoAll"></TodoFooter>
  </div>
</template>

<script>
import TodoHeader from './components/TodoHeader.vue'
import TodoInput from './components/TodoInput.vue'
import TodoList from './components/TodoList.vue'
import TodoFooter from './components/TodoFooter.vue'
export default {
  data() {
    return {
      todos: []
    }
  },
  components : {
    TodoHeader,
    TodoInput,
    TodoList,
    TodoFooter
  },
  created(){
    for(var i = 0 ; i < localStorage.length ; i++){
      if(localStorage.key(i) != 'loglevel:webpack-dev-server'){
        this.todos.push(JSON.parse(localStorage.getItem(localStorage.key(i))))
      }
    }
  },
  methods: {
    addTodoItem(newTodoItem) {
      let item = {
          str : newTodoItem,
          done : false
      }
      localStorage.setItem(newTodoItem, JSON.stringify(item))
      this.todos.push(item)
    },
    clearTodoAll(){
      localStorage.clear()
      this.todos = []
    },
    removeTodo(str, index){
      this.todos.splice(index, 1)
      localStorage.removeItem(str)
    },
    completeTodo(modifyTodo, index){
      this.todos[index].done = !this.todos[index].done
      localStorage.removeItem(modifyTodo.str)
      localStorage.setItem(modifyTodo.str, JSON.stringify(this.todos[index]))
    }
  }
}
</script>

<style>
body {
  text-align: center;
  background-color : #f6f6f6;
}
input {
  border-style : groove;
  width: 200px;
}
button {
  border-style : groove;
}
.shadow {
  box-shadow: 5px 10px 10px rgba(0,0,0,0.03);
}
</style>
- TodoInput.vue
<template>
  <div class="inputBox shadow">
    <input type="text" v-model="newTodoItem" @keypress.enter="addTodo">
    <span class="addContainer" @click="addTodo">
        <i class="fas fa-plus addBtn"></i>
    </span>
  </div>
</template>

<script>
export default {
    data() {
        return {
            newTodoItem : ""
        }
    },
    methods: {
        addTodo(){
            if(this.newTodoItem == ""){
                alert('입력된 값이 없습니다.')
            }else{
                this.$emit('addTodoItem', this.newTodoItem)
                this.newTodoItem = ""
            }
        }
    }
}
</script>

<style scoped>
input:focus {
  outline: none;
}
.inputBox {
  background: white;
  height: 50px;
  line-height: 50px;
  border-radius: 5px;
}
.inputBox input {
  border-style: none;
  font-size: 0.9rem;
}
.addContainer {
  float: right;
  background: linear-gradient(to right, #6478FB, #8763FB);
  display: block;
  width: 3rem;
  border-radius: 0 5px 5px 0;
}
.addBtn {
  cursor: pointer;
  color: white;
  vertical-align: middle;
}
.closeModalBtn {
  color: #42b983;
}
</style>
- TodoHeader.vue
<template>
  <header>
    <h1>TODO IT!</h1>
  </header>
</template>


<style scoped>
  h1 {
    color : #2F3B52;
    font-weight : 900;
    margin : 2.5rem 0 1.5rem;
  }
</style>
- TodoList.vue
<template>
  <ul>
    <li v-for="(todo, index) in todos" :key=todo.str>
        <i class="checkBtn fas fa-check" :class="{checkBtnCompleted: todo.done}"
            @click="toggleComplete({todo, index})"></i>
        <span :class="{textCompleted: todo.done}">{{todo.str}} </span>
        <span class="removeBtn" v-on:click="removeTodo({todo, index})">
          <i class="fas fa-trash-alt"></i>
        </span>
    </li>
  </ul>
</template>

<script>
export default {
    props: ["todos"],
    methods: {
      toggleComplete(modifyTodo) {
        this.$emit('completeTodo', modifyTodo.todo, modifyTodo.index)
      },
      removeTodo(modifyTodo) {
        this.$emit('removeTodo', modifyTodo.todo, modifyTodo.index)
      }
    }

}
</script>

<style scoped>
ul {
  list-style-type: none;
  padding-left: 0px;
  margin-top: 0;
  text-align: left;
}
li {
  display: flex;
  min-height: 50;
  height: 50px;
  line-height : 50px;
  margin: 0.5rem 0;
  padding: 0 0.9rem;
  background: white;
  border-radius: 5px;
}
.checkBtn {
  line-height: 45px;
  color: #62acde;
  margin-right: 5px;
}
.removeBtn {
  margin-left: auto;
  color : #de4343;
}
.checkBtnCompleted {
color : #b3adad;
}
.textCompleted {
  text-decoration: line-through;
  color: #b3adad;
}
/* 리스트 아이템 트랜지션 효과 */
.list-enter-active, .list-leave-active {
  transition: all 1s;
}
.list-enter, list-leave-to {
  opacity: 0;
  transform: translateY(30px);
}
</style>
- TodoFooter.vue
<template>
  <div class="clearAllContainer">
    <span class="clearAllBtn" v-on:click="clearTodo">Clear All</span>
  </div>
</template>

<script>
export default {
  methods : {
    clearTodo() {
      this.$emit('clearTodoAll')
    }
  }

}
</script>

<style>
.clearAllContainer {
  width: 8.5rem;
  height: 50px;
  line-height: 50px;
  background-color: white;
  border-radius: 5px;
  margin: 0 auto;
}
.clearAllBtn {
  cursor: pointer;
  color: #e20303;
  display: block;
}
</style>
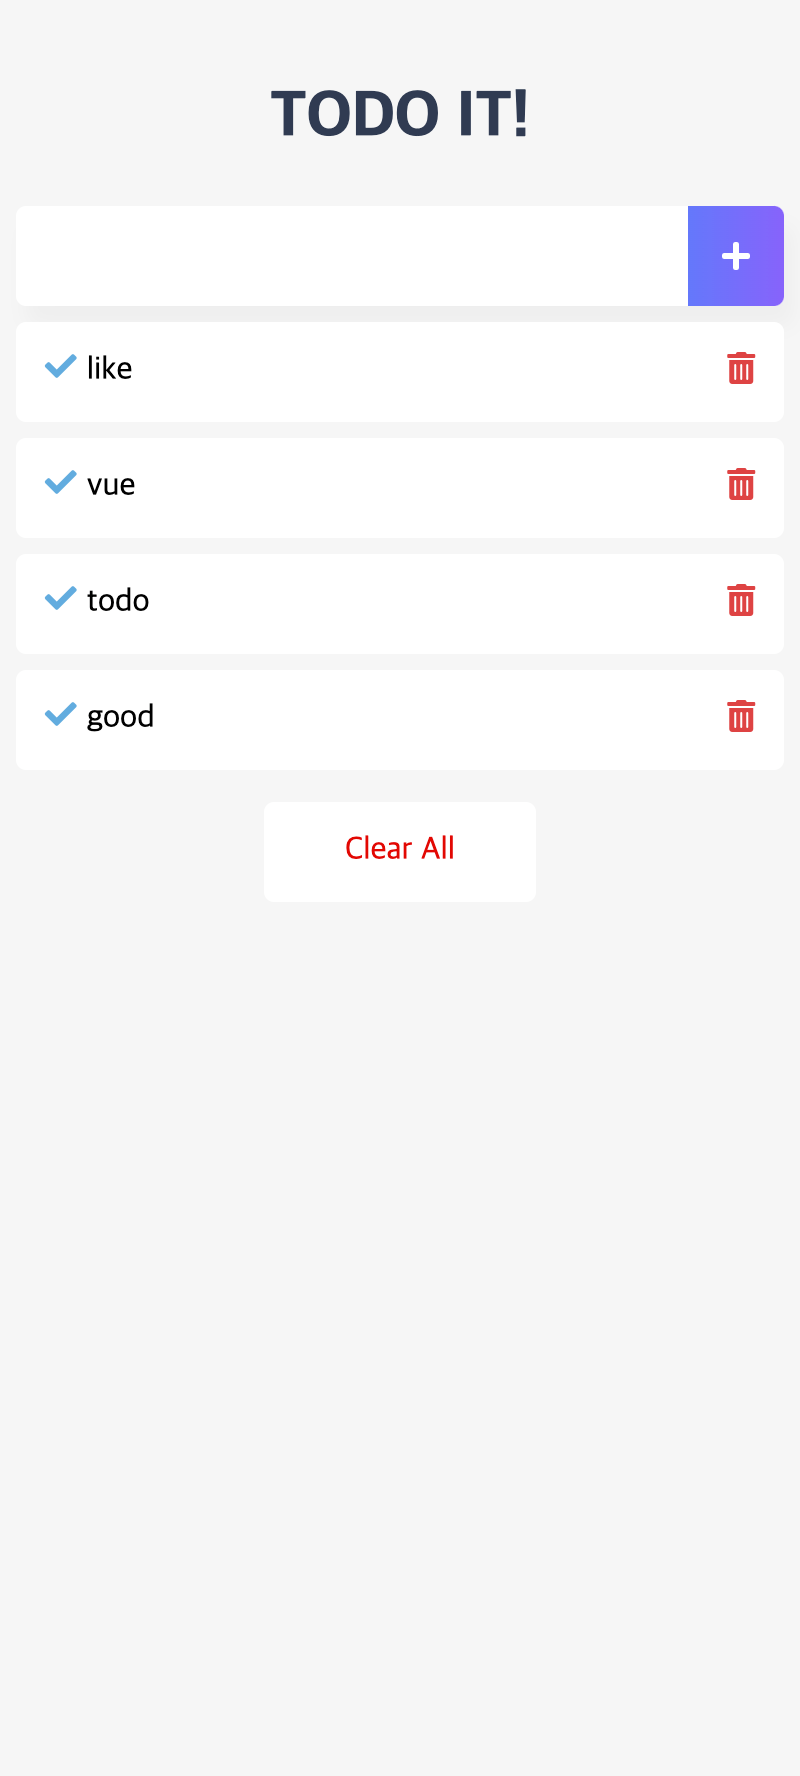
결과 화면
마무리
강의 내용을 정리할 겸 새롭게 짜 본 소스이다.
강의만큼 깔끔하지는 않지만 기능적으로는 잘 돌아가도록 만들었다.
해당 소스는 vuex를 이용하지 않고 props와 emit만을 컴포넌트 간 통신을 하였다.
추후에는 해당 소스를 vuex로 변환하여 올릴 생각이다.
본 포스팅은 여기까지 입니다.
읽어주셔서 감사합니다.
반응형
'Vue' 카테고리의 다른 글
| [vue] todo-list 생성 - vuex (0) | 2021.11.21 |
|---|
